“活在这珍贵的人间,太阳强烈,水波温柔。”
前言
好,年更上线。
主要是自己学习或者带别人学习的时候都是 LinearLayout 起步,然后就懒得学其他布局了
然后不小心尝试了下 ConstantLayout…真香!
所以还是稍稍整理一下,希望能让更多人喜欢 ConstantLayout(
LinearLayout(线性布局)
这应该是最大众的布局,比较有特点的属性大概有这些
android:orientation    //布局方向,vertical=竖直排列,horizontal=水平排列
android:layout_gravity    //当前控件在父容器的对齐方式,值有很多自己去试
                                 我用得比较多的是center_horizontal(水平居中),center_vertical(垂直居中)等
android:gravity="center"    //当前控件的子控件的对齐方式,值有很多自己去试,包括center(居中),bottom(底部)等
android:layout_weight="1"
需要注意的是,最好在每个 LinearLayout 的属性中都规定 orientation 的值(就算有默认值也要写噢,养成好习惯)
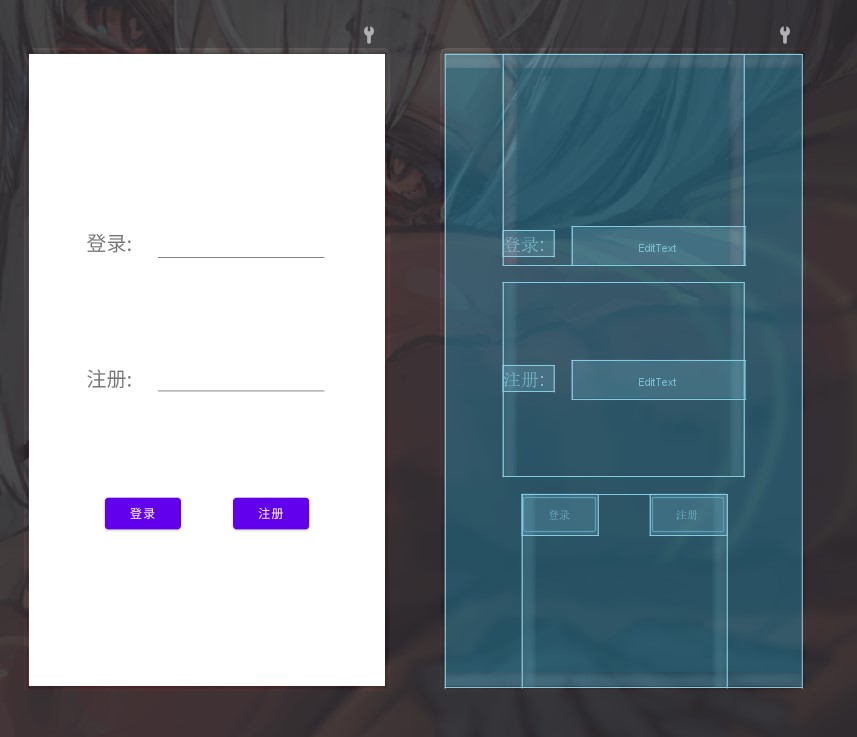
小试身手
来个简单的登录页面试试(当然,布局方式不唯一)
<?xml version="1.0" encoding="utf-8"?>
<LinearLayout
    xmlns:android="http://schemas.android.com/apk/res/android"
    xmlns:app="http://schemas.android.com/apk/res-auto"
    xmlns:tools="http://schemas.android.com/tools"
    android:layout_width="match_parent"
    android:layout_height="match_parent"
    android:orientation="vertical"
    tools:context=".MainActivity">

    <LinearLayout
        android:gravity="bottom"
        android:layout_weight="1"
        android:layout_width="wrap_content"
        android:layout_height="match_parent"
        android:layout_gravity="center_horizontal"
        android:orientation="horizontal">

        <TextView
            android:layout_width="wrap_content"
            android:layout_height="wrap_content"
            android:text="登录: "
            android:textSize="10pt"/>

        <EditText
            android:layout_width="200dp"
            android:layout_height="wrap_content"
            android:layout_marginLeft="20dp"/>

    </LinearLayout>

    <LinearLayout
        android:gravity="center"
        android:layout_weight="1"
        android:layout_marginTop="20dp"
        android:layout_width="wrap_content"
        android:layout_height="match_parent"
        android:layout_gravity="center_horizontal"
        android:orientation="horizontal">

        <TextView
            android:layout_width="wrap_content"
            android:layout_height="wrap_content"
            android:text="注册: "
            android:textSize="10pt"/>

        <EditText
            android:layout_width="200dp"
            android:layout_height="wrap_content"
            android:layout_marginLeft="20dp"/>

    </LinearLayout>

    <LinearLayout
        android:layout_weight="1"
        android:layout_width="wrap_content"
        android:layout_height="match_parent"
        android:layout_gravity="center_horizontal"
        android:layout_marginTop="20dp"
        android:orientation="horizontal">

        <Button
            android:layout_width="wrap_content"
            android:layout_height="wrap_content"
            android:text="登录"/>

        <Button
            android:layout_marginLeft="60dp"
            android:layout_width="wrap_content"
            android:layout_height="wrap_content"
            android:text="注册"/>

    </LinearLayout>

</LinearLayout>
RelativeLayout(相对布局)
RelativeLayout 利用控件和控件之间,或控件和父容器之间的关系来确定各个控件的位置
甚至比较复杂的布局也能用一层 RelativeLayout 来搞定,有效解决了 LinearLayout 多层嵌套的问题
当然缺点是没有 weight 等利用比例来控制控件位置的属性,因此对不同尺寸屏幕的适配没有那么理想
简单用法
1. 根据父容器定位
这类属性的值都是 true/false
android:layout_centerHrizontal     //水平居中
android:layout_centerVertical     //垂直居中
android:layout_centerInparent     //相对于父容器完全居中
android:layout_alignParentBottom     //贴紧父容器的下边
android:layout_alignParentLeft     //贴紧父容器的左边
android:layout_alignParentRight     //贴紧父容器的右边
android:layout_alignParentTop     //贴紧父容器的上边
2. 根据兄弟组件定位
这类属性的值都是其他兄弟控件的 id
android:layout_below     //在某控件下方
android:layout_above     //在某控件上方
android:layout_toLeftOf     //在某控件的左边
android:layout_toRightOf     //在某控件的右边
android:layout_alignTop     //本控件的上边和某控件的上边对齐
android:layout_alignLeft     //本控件的左边缘和某控件的左边对齐
android:layout_alignBottom     //本控件的下边和某控件的下边对齐
android:layout_alignRight     //本控件的右边和某控件的有边对齐
由于对齐后默认是紧贴的,所以想要有空隙就需要 margin 和 padding 来进行调整
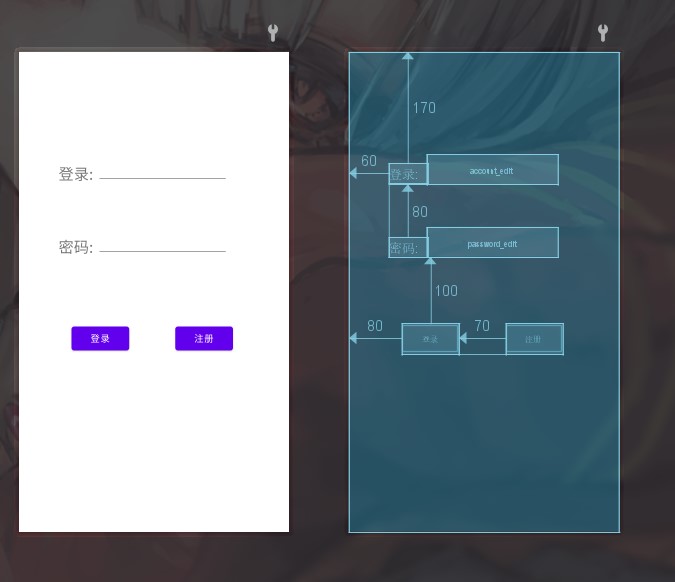
小试身手
还是个简单的登录界面
<?xml version="1.0" encoding="utf-8"?>
<RelativeLayout
    xmlns:android="http://schemas.android.com/apk/res/android"
    xmlns:app="http://schemas.android.com/apk/res-auto"
    xmlns:tools="http://schemas.android.com/tools"
    android:layout_width="match_parent"
    android:layout_height="match_parent"
    tools:context=".MainActivity">

    <TextView
        android:id="@+id/account_text"
        android:layout_width="wrap_content"
        android:layout_height="wrap_content"
        android:layout_alignParentLeft="true"
        android:layout_alignParentTop="true"
        android:layout_marginLeft="60dp"
        android:layout_marginTop="170dp"
        android:text="登录: "
        android:textSize="10pt" />

    <EditText
        android:id="@+id/account_edit"
        android:layout_width="200dp"
        android:layout_height="wrap_content"
        android:layout_toRightOf="@id/account_text"
        android:layout_alignBottom="@id/account_text"/>

    <TextView
        android:id="@+id/password_text"
        android:layout_width="wrap_content"
        android:layout_height="wrap_content"
        android:text="密码: "
        android:textSize="10pt"
        android:layout_below="@id/account_text"
        android:layout_alignLeft="@id/account_text"
        android:layout_marginTop="80dp"/>

    <EditText
        android:id="@+id/password_edit"
        android:layout_width="200dp"
        android:layout_height="wrap_content"
        android:layout_alignBottom="@id/password_text"
        android:layout_toRightOf="@id/password_text"
        />

    <Button
        android:id="@+id/login_btn"
        android:layout_width="wrap_content"
        android:layout_height="wrap_content"
        android:text="登录"
        android:layout_below="@id/password_text"
        android:layout_alignParentLeft="true"
        android:layout_marginTop="100dp"
        android:layout_marginLeft="80dp"/>

    <Button
        android:id="@+id/register_btn"
        android:layout_width="wrap_content"
        android:layout_height="wrap_content"
        android:text="注册"
        android:layout_toRightOf="@id/login_btn"
        android:layout_alignBottom="@id/login_btn"
        android:layout_marginLeft="70dp"
</RelativeLayout>
ConstrainLayout(约束布局)
ConstrainLayout 作为一种比较新的布局方式,在 Android Studio 2.2 中新增,同时谷歌也在 2016 年的 I/O 大会上进行宣传。
在使用 LinearLayout(线性布局)和 RelativeLayout(相对布局)的时候,我们的布局常常通过 xml 代码实现,旁边的 Design 可视化界面似乎可有可无,偶尔看上一眼预览效果。而 ConstrainLayout 则相反,他更倾向于直接在可视化界面上对控件拖拽进行操作,因此得到许多初学者的青睐和官方的推荐。
如果 LinearLayout 用的比较多,肯定会常常进行布局的嵌套,一个 LinearLayout 套着另一个 LinearLayout,写着写着一不留神就找不到自己的控件在哪了。而 ConstrainLayout 则类似 RelativeLayout,利用控件之间的约束来决定控件的位置,因此能有效避免布局的嵌套。当然他比 RelativeLayout 更加强大。
来看用法
1. 相对位置的约束
既然是约束,那就是上下左右的约束,分别用以下方式约束:
        app:layout_constraintBottom_toBottomOf="A"  //当前控件的下沿和A控件下沿相同
        app:layout_constraintBottom_toTopOf="A"    //当前控件的下沿和A控件上沿相同
        app:layout_constraintLeft_toLeftOf="B"    //当前控件的左沿和B控件左沿相同
        app:layout_constraintLeft_toRightOf="B"    //当前控件的左沿和B控件右沿相同
        app:layout_constraintRight_toRightOf="C"    //当前控件的右沿和C控件右沿相同
        app:layout_constraintRight_toLeftOf="C"    //当前控件的右沿和C控件左沿相同
        app:layout_constraintTop_toTopOf="D"     //当前控件的上沿和D控件上沿相同
        app:layout_constraintTop_toBottomOf="D"    //当前控件的上沿和D控件下沿相同
        layout_constraintBaseline_toBaselineOf="E"    //当前控件的基准线和E控件的基准线相同
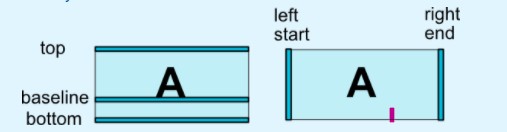
上下左右和基准线就像下图所示,left 和 start,right 和 end 是可以替换哒,他们是同一个意思。
(图片来源于 developers)
相信你已经找到规律了,虽然这些命令很长不想看,但却死板地有些可爱。
总的来说,命令的格式就是
app:layout_constraint方向1_to方向2Of="目标控件"
方向 1=当前控件的某条边,方向 2=目标控件的某条边,然后把他们贴贴对齐就好了
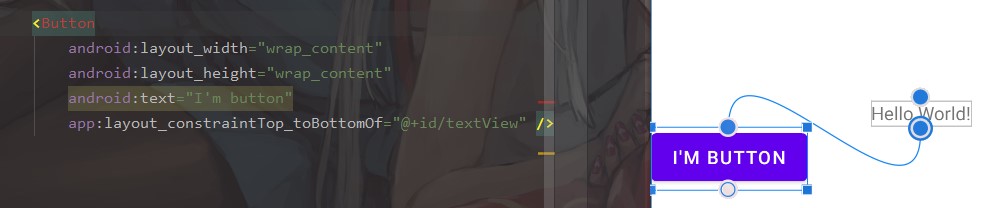
比如把一个 button 放到 textview 的右下角,这样就好啦
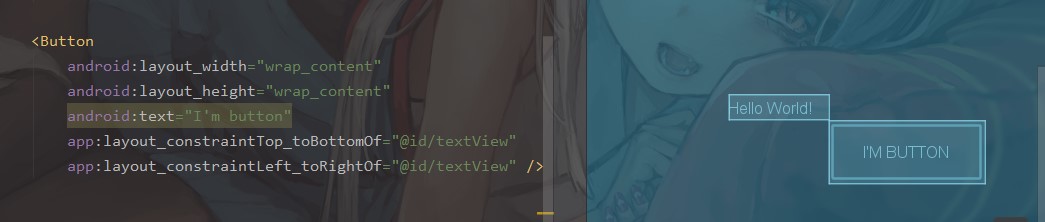
当然,像之前所说,ConstrainLayout 更加支持我们在可视化界面中进行拖拽来布局,只要我们选中一个控件,就可以把它的某个方向的边边拖到另一个控件的边边上,这样就能成功进行约束,当然代码也会自动生成啦。(下面因为只有上下约束没有左右约束所以控件报错了,好孩子不要学噢)
2. 间隔
因为对齐默认是紧贴的,所以控件之间的间隔通常就用margin来实现了
margin 还是老样子,不用多说,left 和 start,right 和 end 同样可以互换
android:layout_marginLeft=""
android:layout_marginTop=""
android:layout_marginRight=""
android:layout_marginBottom=""
3. bias 比例
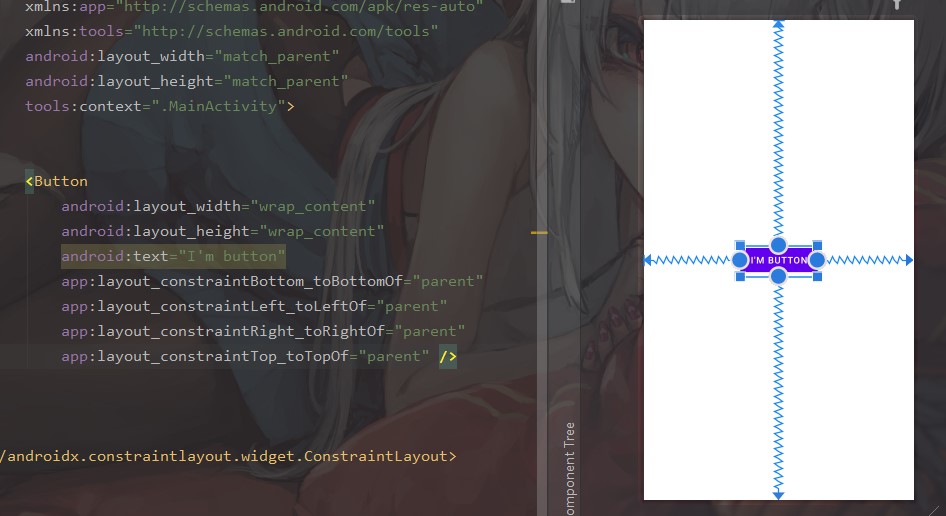
当我们同时施加左右约束,当前控件会相对于目标控件居中,因此在整个布局中居中可以这样:
事实上,控件进行约束后他的位置可以由 bias 来控制,分为水平和竖直两个方向
layout_constraintHorizontal_bias="0.5"
layout_constraintVertical_bias="0.5"
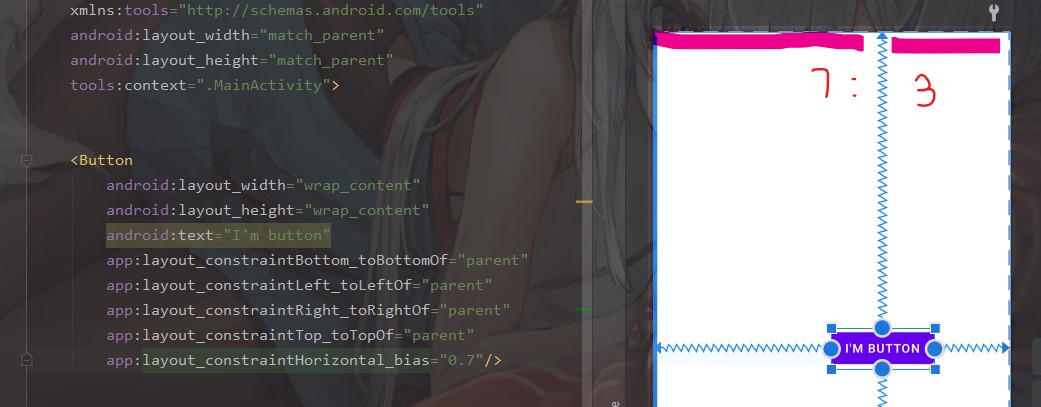
bias 决定了控件在约束范围内的位置,通常情况下值是 0~1 之间,表示控件所在的位置
比如 0.3 就表示这个控件左边/上面的空白 : 右边/下面的空白=3 : 7,0.4 就表示左边/上面的空白 : 右边/下面的空白=4 : 6
而这个属性默认是 0.5,因此什么都不写的话就会居中了。
水平的 bias=0.7 就是这个样子
用比例而不是具体数值调整位置,永远的一个优点就是能更好适配不同尺寸的屏幕
4. 圆形的相对位置
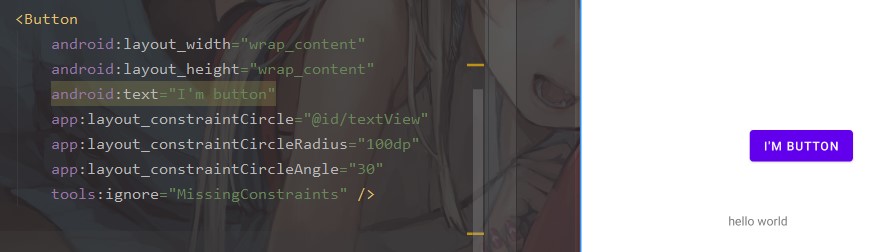
之前的相对位置调整的是上下左右,但是如果给出角度和半径,也可以实现类似圆形的布局方法
layout_constraintCircle="A"    //A是原点控件
layout_constraintCircleRadius="100dp"    //圆形半径
layout_constraintCircleAngle="45"    //(0-360)的角度,从十二点方向逆时针计算
效果大概就是这样
5. 还有其他功能…
我挑了些比较好写常用的功能做个简单的介绍,想要深入学习可以去 developers 中看看
ConstrainLayout 还有许多其他功能,比如给控件设置隐藏、目标控件隐藏了当前控件怎么办之类的
还提供了一个Chain 链的东西,挺好用的,乍一看像是前端的 flex,在下面的布局中我也用到了
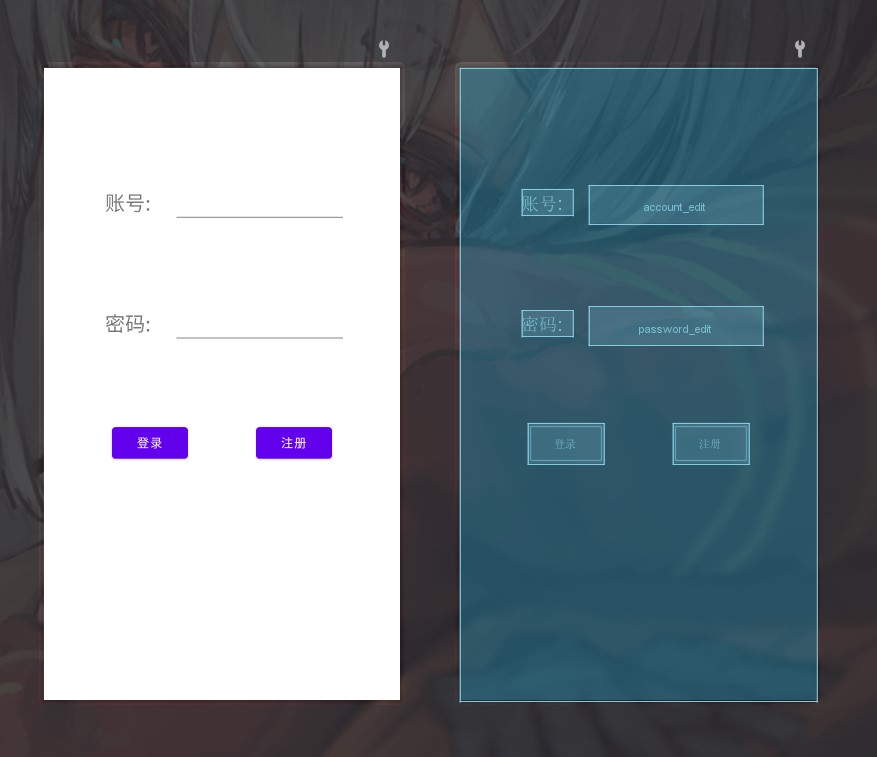
小试身手
来做个简单的登录界面吧!
<?xml version="1.0" encoding="utf-8"?>
<androidx.constraintlayout.widget.ConstraintLayout
    xmlns:android="http://schemas.android.com/apk/res/android"
    xmlns:app="http://schemas.android.com/apk/res-auto"
    xmlns:tools="http://schemas.android.com/tools"
    android:layout_width="match_parent"
    android:layout_height="match_parent"
    tools:context=".MainActivity">

    <TextView
        android:id="@+id/account_text"
        android:layout_width="wrap_content"
        android:layout_height="wrap_content"
        android:text="账号: "
        android:textSize="10pt"
        app:layout_constraintLeft_toLeftOf="parent"
        app:layout_constraintRight_toRightOf="parent"
        app:layout_constraintTop_toTopOf="parent"
        app:layout_constraintBottom_toBottomOf="parent"
        app:layout_constraintVertical_bias="0.2"
        app:layout_constraintHorizontal_bias="0.2"/>

    <EditText
        android:id="@+id/account_edit"
        android:layout_width="200dp"
        android:layout_height="wrap_content"
        app:layout_constraintBaseline_toBaselineOf="@id/account_text"
        app:layout_constraintLeft_toRightOf="@id/account_text"
        android:layout_marginLeft="20dp"/>

    <TextView
        android:id="@+id/password_text"
        android:layout_width="wrap_content"
        android:layout_height="wrap_content"
        android:text="密码: "
        android:textSize="10pt"
        app:layout_constraintLeft_toLeftOf="parent"
        app:layout_constraintRight_toRightOf="parent"
        app:layout_constraintTop_toTopOf="parent"
        app:layout_constraintBottom_toBottomOf="parent"
        app:layout_constraintVertical_bias="0.4"
        app:layout_constraintHorizontal_bias="0.2"/>

    <EditText
        android:id="@+id/password_edit"
        android:layout_width="200dp"
        android:layout_height="wrap_content"
        app:layout_constraintBaseline_toBaselineOf="@id/password_text"
        app:layout_constraintLeft_toRightOf="@id/password_text"
        android:layout_marginLeft="20dp"
        android:inputType="textPassword"/>

    <Button
        android:id="@+id/login_btn"
        android:layout_width="wrap_content"
        android:layout_height="wrap_content"
        android:text="登录"
        app:layout_constraintStart_toStartOf="parent"
        app:layout_constraintEnd_toStartOf="@id/register_btn"
        app:layout_constraintTop_toTopOf="parent"
        app:layout_constraintBottom_toBottomOf="parent"
        app:layout_constraintVertical_bias="0.6"
        app:layout_constraintVertical_chainStyle="spread_inside"/>

    <Button
        android:id="@+id/register_btn"
        android:layout_width="wrap_content"
        android:layout_height="wrap_content"
        android:text="注册"
        app:layout_constraintStart_toEndOf="@+id/login_btn"
        app:layout_constraintBottom_toBottomOf="@id/login_btn"
        app:layout_constraintEnd_toEndOf="parent"/>

</androidx.constraintlayout.widget.ConstraintLayout>
最后的话
总的来说,妹有最好的布局,只有最合适的布局。
选用什么样的布局,要根据当前需求来,如果只会一个布局一股脑地使用,是会吃亏的哦。
还要注意,并不是选择了一个布局,就只能使用这个布局。我们还可以用不同布局进行嵌套,比如在 RelativeLayout 中嵌套 LinearLayout,这样既能减少 LinearLayout 带来的嵌套,又能使用 LinearLayout 中的 weight 属性来给不同尺寸的屏幕带来更好的适配
参考
- 2.2.1 LinearLayout(线性布局)
- 2.2.2 RelativeLayout(相对布局)
- developers 中的 ConstraintLayout
- Android 新特性介绍,ConstraintLayout 完全解析 by 郭霖
- Android ConstraintLayout 使用详解:这篇可以和 developers 配合来看,基本上是中文翻译过来的方法