“各人下雪,各有各的隐晦与皎洁。”
前言
本来想折腾自定义 Adapter 的,结果发现自己连系统自带的 Adapter 都不会用…
在 Android 入门的时候,Adapter 是一个比较大的坎
从这里开始 Android 变得抽象而又有些复杂,于是打算试试能不能把 Adapter 这块给整理一下
今天就邀请 ListView 作为嘉宾,用一用 ArrayAdapter 和 SimpleAdapter
不过他们都是官方定义好的 Adapter,用法已经固定
能理顺的话我加把劲整理一下搞定自定义 Adapter
Adapter:ArrayAdapter 和 SimpleAdapter 适配 ListView
先简单介绍下 Adapter 的概念和 ListView
Adapter
Adapter 其实就是一个桥梁,他连接了数据和布局,让数据能够显示在特定布局上
为什么需要连接数据和布局呢?
因为如 ListView,GridView 等 AdapterView,他们含有很多个小的 item 项,每个 item 项的内容都不相同,而我们难以直接在布局文件中直接对其进行设置。
于是就有了 Adapter,在程序运行时将数据绑定到每个 item 中,从而让每个 item 显示自己的值。
| 适配器 | 简介 |
|---|---|
| BaseAdapter | 基础适配器,是一个抽象类,大多自定义适配器的时候也是继承他 |
| ArrayAdapter | 比较简单,只能显示一行文本,不过可以使用泛型结构(<String>泛型) |
| SimpleAdapter | 简单适配器(名字简单用起来不简单),相比 ArrayAdapter,可以通过 Map 映射多个不同类型数据,实现比较复杂的布局 |
| SimpleCursorAdapter | Cursor 是 Android 的一个接口,接受来自数据库的数据并进行操作。因此如果数据源来自数据库则常用这个 Adapter |
ListView
ListView 作为贯穿全场的龙套,这里介绍下
相比 RecyclerView,ListView 更加简单,但功能也比较受限。
ListView 能简单地实现纵向列表,而 RecyclerView 能相对简单地实现横向列表、瀑布流等布局
ListView 常用属性有下(其实也不怎么常用):
| 属性 | 作用 |
|---|---|
| android:divider | 两个 item 之间的分割线颜色 |
| android:dividerHeight | 分割线的高度(粗细) |
| android:entries | 直接给 item 设置的静态数据 |
| android:scrollbars | 是否有滚动条 |
| android:fadeScrollbars | 不滚动时滚动条是否隐藏 |
事实上,ViewGroup 有一个子类叫 AdapterView,他的子类通常都需要 Adapter 来实现
比如 AdapterView 的一个子类是 AbsListView,而 ListView,GridView 等都是 AbsListView 的子类
ArrayAdapter 适配 ListView
布局有个 ListView
在 xml 布局文件中咱创一个 ListView
<?xml version="1.0" encoding="utf-8"?>
<LinearLayout
    xmlns:android="http://schemas.android.com/apk/res/android"
    xmlns:app="http://schemas.android.com/apk/res-auto"
    xmlns:tools="http://schemas.android.com/tools"
    android:layout_width="match_parent"
    android:layout_height="match_parent"
    android:orientation="vertical"
    tools:context=".MainActivity">

    <ListView
        android:id="@+id/main_list_view"
        android:layout_width="match_parent"
        android:layout_height="match_parent" />

</LinearLayout>
在 Activity 中创建 Adapter 并适配
我们实例化 ListView 并让他和布局的 ListView 绑定
public class MainActivity extends AppCompatActivity {
    ListView listView;

    @Override
    protected void onCreate(Bundle savedInstanceState) {
        super.onCreate(savedInstanceState);
        setContentView(R.layout.activity_main);

        listView = findViewById(R.id.main_list_view);
    }
}
我们来创建一个 String 数组来作为 ListView 每个 item 的显示内容,随便写点啥
String[] data = {"我是1", "我是2", "我是3","我是4", "我是5"};
然后创建 ArrayAdapter
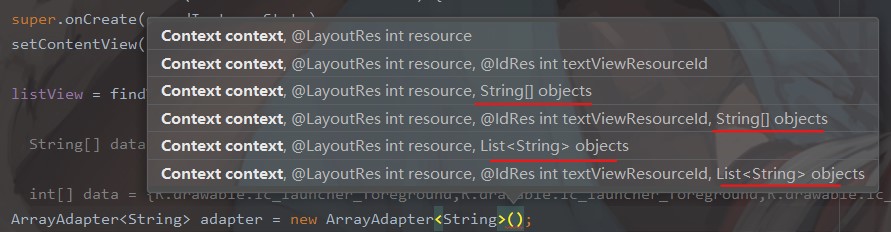
他本身有很多构造方法,常用的是传入三个参数,分别为:上下文 context,item 的布局文件,每个 item 对应的数据(String 数组)
这里为了偷懒所以用了系统自带的布局R.layout.simple_list_item_1
    String[] data = {"我是1", "我是2", "我是3","我是4", "我是5"};
    ArrayAdapter<String> adapter = new ArrayAdapter<String>(this, android.R.layout.simple_list_item_1, data);
最后调用 listView 的setAdapter()方法将 ListView 和 ArrayAdapter 相关联
listView.setAdapter(adapter);
完整的代码是这样
public class MainActivity extends AppCompatActivity {
    ListView listView;

    @Override
    protected void onCreate(Bundle savedInstanceState) {
        super.onCreate(savedInstanceState);
        setContentView(R.layout.activity_main);
        //绑定
        listView = findViewById(R.id.main_list_view);
        //数据源
        String[] data = {"我是1", "我是2", "我是3","我是4", "我是5"};
        //适配器
        ArrayAdapter<String> adapter = new ArrayAdapter<String>(this, android.R.layout.simple_list_item_1, data);
        //关联
        listView.setAdapter(adapter);
    }
}
这时候有同学就要问啦
既然 ArrayAdapter 传入的是一个数组的数据(上面是 String 数组),那我能不能传入其他类型的数据(比如图片)呢?
看起来很有道理但其实是不行的,因为在我们所使用的 ArrayAdapter 构造方法中,规定了是一个String 的数组对象(第三条)
即便是其他的构造方法,也都规定了<String>的泛型
所以很遗憾不能传入图片了 QAQ, 不过虽然 ArrayAdapter 不行,还有其他 Adapter 可以呢
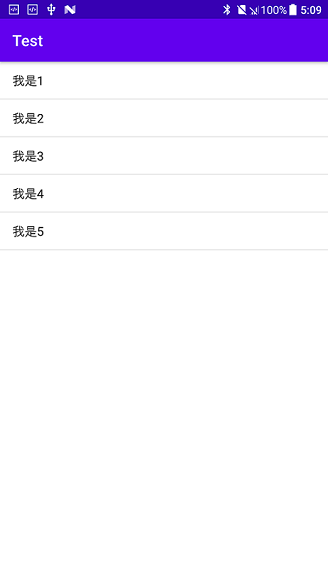
最后的效果是这样,每个 item 只有一行文字
小结
用 ArrayAdapter 适配 ListView 可以分为以下几个步骤:
- 布局里有 ListView(废话)
- 编写 item 布局(或者偷懒用已有的布局)
- 在 Activity 中实例化并绑定 ListView
- 创建(或接收)数据源(String 文本)
- 创建适配器(ArrayAdapter)
- 关联适配器和 ListView
SimpleAdapter 适配 ListView
布局有个 ListView
在 activity_main.xml 主布局文件中咱创一个 ListView
<?xml version="1.0" encoding="utf-8"?>
<LinearLayout
    xmlns:android="http://schemas.android.com/apk/res/android"
    xmlns:app="http://schemas.android.com/apk/res-auto"
    xmlns:tools="http://schemas.android.com/tools"
    android:layout_width="match_parent"
    android:layout_height="match_parent"
    android:orientation="vertical"
    tools:context=".MainActivity">

    <ListView
        android:id="@+id/main_list_view"
        android:layout_width="match_parent"
        android:layout_height="match_parent" />

</LinearLayout>
还有 item 的布局
新建一个 item 的布局,我叫他 item.xml
注意一下因为偷懒所以采用了系统自带的图片=v=
在最外层的 LinearLayout 中有个android:descendantFocusability=”blocksDescendants”属性
因为 item 中如果含有按钮的话,按钮会抢夺焦点,导致点击按钮之外的地方没有反应(有反应的话整行是会变色的)
而这个属性则可以解决这个 bug
<?xml version="1.0" encoding="utf-8"?>
<LinearLayout
    xmlns:android="http://schemas.android.com/apk/res/android"
    xmlns:app="http://schemas.android.com/apk/res-auto"
    xmlns:tools="http://schemas.android.com/tools"
    android:layout_width="match_parent"
    android:layout_height="match_parent"
    android:orientation="horizontal"
    android:descendantFocusability="blocksDescendants"
    tools:context=".MainActivity">

    <ImageView
        android:id="@+id/item_logo"
        android:layout_width="70dp"
        android:layout_height="70dp"
        android:src="@drawable/ic_launcher_foreground"/>


    <LinearLayout
        android:layout_width="0dp"
        android:layout_height="wrap_content"
        android:layout_weight="1"
        android:layout_marginLeft="5dp"
        android:orientation="vertical">

        <TextView
            android:id="@+id/item_name"
            android:layout_width="wrap_content"
            android:layout_height="wrap_content"
            android:text="Android"
            android:textSize="16sp"
            android:textStyle="bold"
            android:layout_marginTop="2dp"/>

        <TextView
            android:id="@+id/item_sex"
            android:layout_width="wrap_content"
            android:layout_height="wrap_content"
            android:text="sex: unknown"
            android:textSize="12sp"/>

        <TextView
            android:id="@+id/item_age"
            android:layout_width="wrap_content"
            android:layout_height="wrap_content"
            android:text="age:8"
            android:textSize="12sp"/>

    </LinearLayout>

    <Button
        android:id="@+id/item_btn"
        android:layout_width="wrap_content"
        android:layout_height="50dp"
        android:text="添加好友"
        android:layout_marginRight="10dp"
        android:layout_marginTop="5dp"/>

</LinearLayout>
在 Activity 中创建 Adapter 并适配
先实例化 ListView 然后绑定,这里不变,略过
然后是搞个数据源
这里利用 Map 存储所需数据的键值对,一个 item 的多个数据作为一个 map,然后把这些 map 全部放进 List 中
        //数据源
        List<Map<String, Object>> list = new ArrayList<Map<String, Object>>();
        Map<String, Object> map = new HashMap<String, Object>();
        map.put("logo", R.drawable.ic_launcher_foreground);
        map.put("name", "android");
        map.put("sex", "sex: unknown");
        map.put("age", "age:unknown");
        list.add(map);

        map = new HashMap<String, Object>();
        map.put("logo", R.drawable.ic_launcher_background);
        map.put("name", "Young");
        map.put("sex", "sex: male");
        map.put("age", "age:18");
        list.add(map);

        map = new HashMap<String, Object>();
        map.put("logo", R.drawable.ic_launcher_foreground);
        map.put("name", "BlackDn");
        map.put("sex", "sex: male");
        map.put("age", "age:21");
        list.add(map);

        map = new HashMap<String, Object>();
        map.put("logo", R.drawable.ic_launcher_background);
        map.put("name", "Lily");
        map.put("sex", "sex: female");
        map.put("age", "age:16");
        list.add(map);
之后是创建适配器 SimpleAdapter
参数分别为:context 上下文,数据源(Map 的集合),item 布局,绑定的数据(键值对的 key 组成的 String 数组),布局的 id(int 数组)
注意这里的 String 数组存放的是之前 map 中键值对的关键字(key),而 int 数组则是 item 布局中所对应的控件 id
关键字(key)和控件 id 要一一对应,这样才会将数据正确显示在布局上
键值对保存数据时采用“关键字——值”的形式,而在 simpleAdapter 中绑定时采用“关键字——布局”的形式
系统在运行时会根据关键字,找到对应的值,放到绑定的布局中
        //适配器
        String[] from = new String[] {"logo", "name", "sex", "age"};
        int[] to = new int[] {R.id.item_logo, R.id.item_name, R.id.item_sex, R.id.item_age};
        SimpleAdapter simpleAdapter = new SimpleAdapter(this, list, R.layout.item, from, to);
        // 简便写法
        // SimpleAdapter simpleAdapter = new SimpleAdapter(this, list, R.layout.item, new String[] {"logo", "name", "sex", "age"}, new int[] {R.id.item_logo});
有些同学在这容易头晕,为什么绑定的数据要叫 from,布局的 id 要叫 to 呢?(提示是这样叫的,可不是我随便命名的噢)
可以这样理解,adapter 要将数据显示在布局上,所以是数据->布局,所以是from 数据,to 布局
还有一点令人奇怪的是,我们这个 Activity 绑定的布局是 activity_main.xml,但为什么 int 数组中可以写 item.xml 中的 id 呢?
这是因为在 simpleAdapter 中我们已经传入了 item 的布局(第三个参数),因此后面的 id 他会在 item 的布局中查找,这就不会和我们的主布局搞混了
最后关联一下即可,这里略过
完整的代码是这样
public class MainActivity extends AppCompatActivity {
    ListView listView;

    @Override
    protected void onCreate(Bundle savedInstanceState) {
        super.onCreate(savedInstanceState);
        setContentView(R.layout.activity_main);
        //绑定
        listView = findViewById(R.id.main_list_view);
        //数据源
        List<Map<String, Object>> list = new ArrayList<Map<String, Object>>();
        Map<String, Object> map = new HashMap<String, Object>();
        map.put("logo", R.drawable.ic_launcher_foreground);
        map.put("name", "android");
        map.put("sex", "sex: unknown");
        map.put("age", "age:unknown");
        list.add(map);

        map = new HashMap<String, Object>();
        map.put("logo", R.drawable.ic_launcher_background);
        map.put("name", "Young");
        map.put("sex", "sex: male");
        map.put("age", "age:18");
        list.add(map);

        map = new HashMap<String, Object>();
        map.put("logo", R.drawable.ic_launcher_foreground);
        map.put("name", "BlackDn");
        map.put("sex", "sex: male");
        map.put("age", "age:21");
        list.add(map);

        map = new HashMap<String, Object>();
        map.put("logo", R.drawable.ic_launcher_background);
        map.put("name", "Lily");
        map.put("sex", "sex: female");
        map.put("age", "age:16");
        list.add(map);
        //适配器
        String[] from = new String[] {"logo", "name", "sex", "age"};
        int[] to = new int[] {R.id.item_logo, R.id.item_name, R.id.item_sex, R.id.item_age};
        SimpleAdapter simpleAdapter = new SimpleAdapter(this, list, R.layout.item, from, to);
        // 简便写法
        // SimpleAdapter simpleAdapter = new SimpleAdapter(this, list, R.layout.item, new String[] {"logo", "name", "sex", "age"}, new int[] {R.id.item_logo});
        //关联
        listView.setAdapter(simpleAdapter);
    }
}
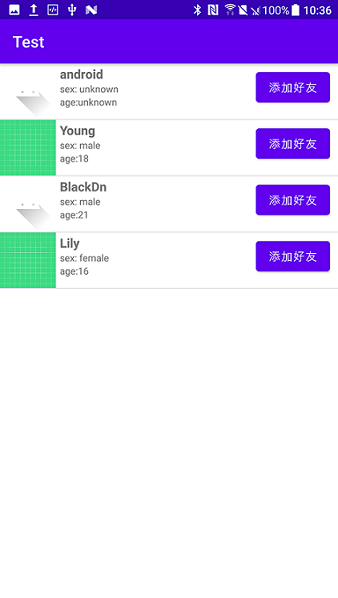
最后的效果是这样
小结
- 布局里有 ListView(还是废话)
- 编写 item 布局
- 在 Activity 中实例化并绑定 ListView
- 创建(或接收)数据源(List<map>)
- 创建适配器(SimpleAdapter)
- 关联适配器和 ListView